Should you use the selfie camera if you want your images to look professional?
The selfie camera is a fun option for our phones to take that quick snap with friends when you want everyone in the photo. It’s also great when you need to quickly make sure you don’t have anything in your teeth before a client meeting and there is no mirror around.
The last one just me? Well okay, but let me tell you, it’s a trick worth noting 🙂
Other than those photos at happy hour with friends, avoid using the selfie camera on your iPhone. Especially when taking photos for business.
Why?

If you want an in depth guide on how to pose for your body – check out my good friend’s Posing Bible. It’s a great guide to posing no matter how uncomfortable you feel in front of the camera! (affiliate link)
Your brand will appear more professional when showing high quality imagery.
Why is the selfie camera (front facing) worse than the rear facing camera?
Megapixels
The quality in megapixels of the rear-facing camera far surpasses the front-facing camera.
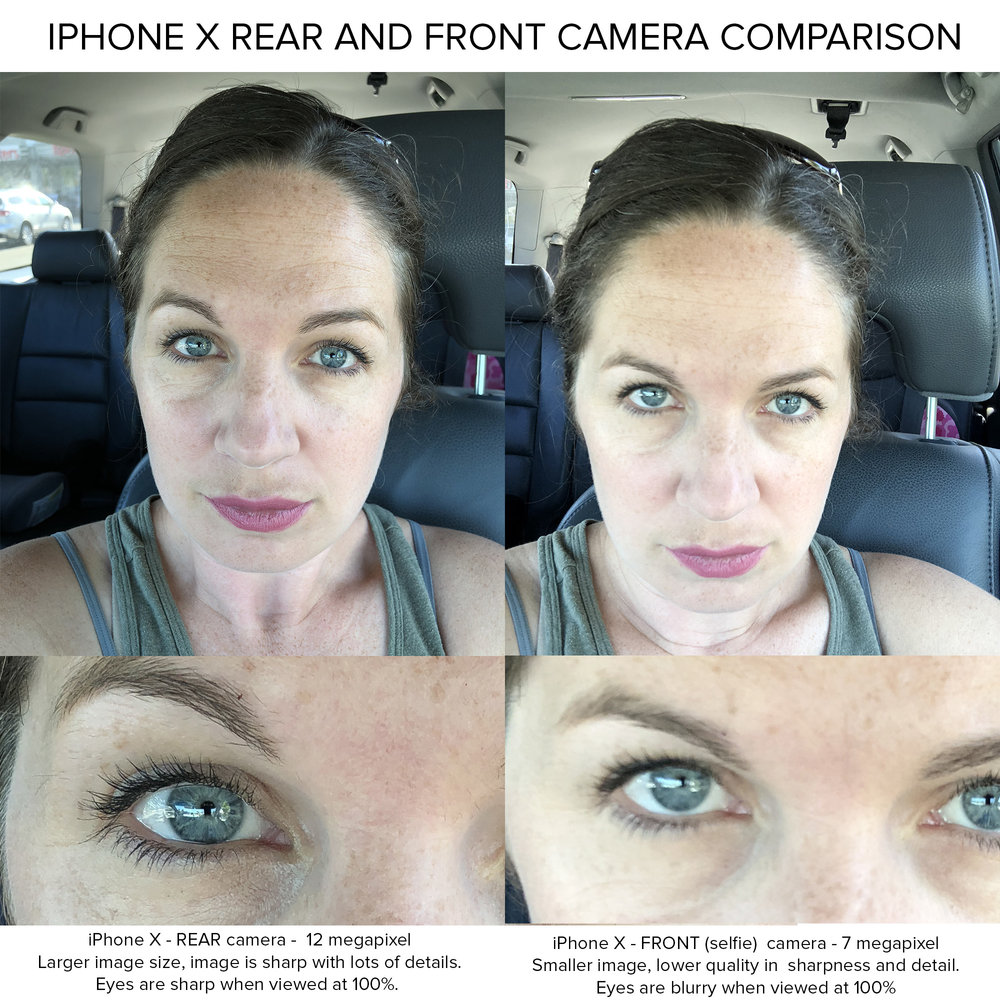
The rear-facing cameras of the iPhone 8 and X are both 12 megapixels, the front-facing camera is only 7 megapixels.
You may be wondering what they are talking about when megapixels get mentioned, so let me explain.
Cameras today have millions of little dots of light. Those dots together create your image, and 1 individual dot of light is a pixel.
Mega means million, so 12 megapixels means approximately 12 million pixels of data
Since the back facing camera has 12 megapixels, and the front has 7 megapixels, there is almost twice the image quality in the back facing camera.
The more pixel data you have, the better quality image you’ll be able to produce.

Don’t mind me, taking selfies in my car while I waited for my kids to get out of school 😂
The three main places you’ll notice this difference in megapixels is:
- if you print the photo, you can print larger if you have more pixels because there is more data
- if you want to be able to crop into the photo afterward, you can do so without losing quality if you have more data.
- if you shoot in low light, you have clearer images because there is more data. FYI, you are shooting in low light most of the time you are shooting indoors.
So, you can take better photos in low light, or use a photo later where you crop in when you have more pixel data. This is one reason to avoid the front facing camera on your iPhone.
Superior Quality of Lens & Sharpness of Image
When Apple created the iPhone, the main focus for the camera of the phone was the rear-facing camera. The front-facing camera seems to be afterthought. Used as an added bonus for selfies, and, the facial recognition to open your phone and apps.
Most photos will be taken with the main rear-facing camera, so it was designed to be the higher quality one.
I’m sure if they made the front-facing camera higher quality, the phone would have jumped another couple hundred in price. I am interested to see if they change the quality of the front camera in the next version of the iPhone!
The megapixel count on a camera is useful for how big you can print, or more realistically for business, how much you can crop. You can crop and still be able to use the image not only on Instagram, but on your website and any promo flyers as well.
The lens quality determines how sharp the image is and detail. The sharper and more detailed the image, the more professional it will look.
For the rear-facing cameras in the iPhone 8 and X, the specs call out a ” sapphire crystal lens cover” as it’s super resistant to scratches. Scratches on your lens are bad for image quality, and the sharpness of the image.
Sapphire glass is great for not scratching but it is more susceptible to cracking. This will lower your image quality, even make your camera not usable, and the price of repair is stupid. To see more check out this article about the fall out of the Sapphire Crystal glass in iPhones.

Faster Lens
The rear facing cameras also have a faster lens.
With a fast lens ( f1.8 on rear facing vs f2.2 on forward facing) your camera can let in more light in those low light situations. This allows for a higher shutter speed which equals less blurry photos. It may also allow for a lower ISO which means less grainy photos.
Faster lens = better quality in low light and less blurry images.
In the photo world, the difference between f1.8 and f2.2 is pretty big when you are in low light. You don’t need to understand apertures and what those “f” numbers mean. Note that the smaller the “f” number, the better your camera will be able to do in low light.
Faster lens = better quality in low light and less blurry images because you moved while the photo was being taken causing image blur.
In the photo world, the difference between f1.8 and f2.2 is pretty big when you are in low light. While you don’t really need to understand apertures and what those “f” numbers mean, just know that the smaller the “f” number, the better your camera will be able to do in low light.

The sharper your image, the more professional your photos will look, so for this alone, I default to using the rear facing camera
Always keep in mind:
When you are producing images for your business, you always want to create the highest quality option available. You never know when you’ll want to use these images again. The more professional your images look, the more cohesive your brand.
So why does this matter as you are taking photos with your iPhone for your business?
It’s becoming a competitive edge when photos of you show up in your business, on your Instagram feed and your website. Showing the person behind the biz is big right now, and so I’m seeing more selfie photos. But don’t fall into that trap.
It doesn’t look good. Don’t lower the appearance of your brand for the convenience of the quick snap. That arm reaching out look is super obvious as well!
Here are my tips to using the rear-facing camera even when needing a “selfie”
- Have a friend/partner take the photo for you. You’ll be able to get farther away (which is more appealing). You’ll add environment, and you won’t look like you are taking a selfie.
- If you don’t have the option of a friend/partner to take the photo, then invest in a tripod for your iPhone.
- I like the Yoozon Selfie Stick (affiliate link). It’s the size of a selfie stick, but it has tripod legs to convert it from a selfie stick to a tripod. It has a bluetooth trigger so you don’t have to rely on setting a timer and then running. It also has a little reflective mirror on it, so if you are trying to take a selfie while using the rear-facing camera, you have an idea of what you’ll be seeing in the camera (genius!!) The tripod extends pretty high so there are a lot of options in the $22 price point.
- Another more compact tripod option is the UBeesize compact tripod (affiliate link). This one has bendy legs that you can wrap around objects like a tree limb or a lamp post. So you can have your camera attach to most anything while you are out and about. This also comes with a remote trigger!
- Take lots of photos. If you are setting up a tripod and making a go of it, expect there to be a learning curve. Take lots of photos, changing your position, expression and angle a little bit after every 2 or 3 images. Then pick your favorite of the group. Make sure to go through and delete the ones you don’t like afterward so you don’t waste your memory on images you’ll never use!
The comments +