


You know how important social media is in business today. And it’s even more important than ever to know how to get great photos for social media.
Photos and videos engage WAY more than a simple text post will.
If you are no a photographer, this can leave you feeling frustrated and overwhelmed, right?
Because you don’t know what makes a great photo.
The great thing about technology is that we now can create amazing images with our smartphone. And we know we need great photos for social media.
We no longer need to know the ins and outs of photography itself.
Armed with a handful of tips and tricks and your smartphone, you can get great photos for social media. Easy peasy.
How to Get Great Photos For Social Media

1 – Be Intentional
I couldn’t tell you how often I see people pick up their phone to take a photo and don’t think it through.
In the time it takes to open the app, compose and take the image, then put their phone away, it’s been like 2.5 seconds.
Can you relate? Have you ever done that? This isn’t a way to get great photos for your social media.
How can you create a compelling image that is engaging if you weren’t ever fully engaged when capturing the image?
Next time, think for a minute about what you want to photograph and why.
Then when you pull your phone out of your pocket, take a minute actually looking at what is in the frame.
[convertkit form=919804]
Make sure it’s what you want, before taking the photo.
Things to look at are :
Is the entire object (person, product, or whatever the focus of your image is) in the frame?
Take a look at the coffee cup photo below. The image on the left, taken quickly cuts in to the side of the coffee cup and has a lot of extra pointless space at the top of the frame.
Looking at the image on the right, slight adjustments were made, as I was intentional in the image I was creating and removed the space at the top and ensured the entire cup was in the frame.
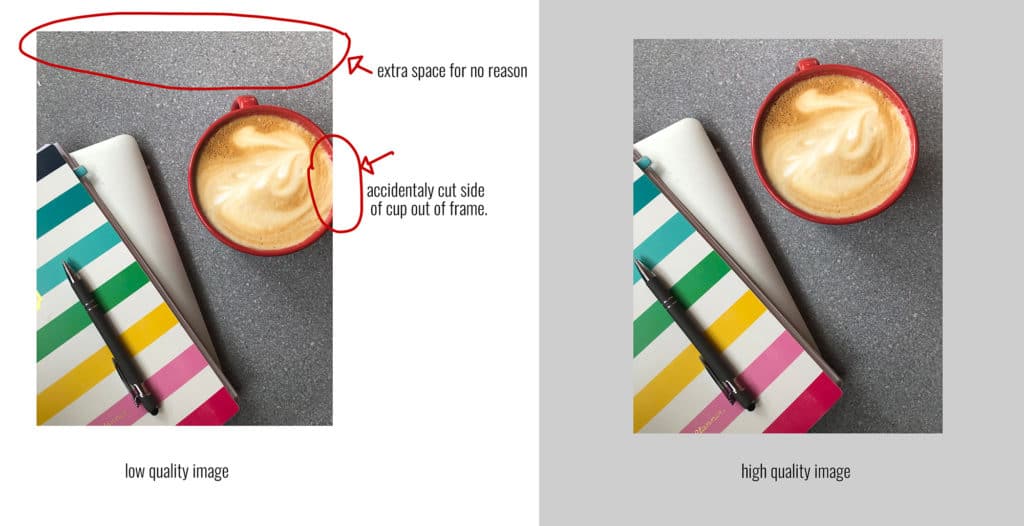
Is there any empty space at the top or the bottom of the frame that doesn’t have a purpose? If so adjust the frame to remove the extra space as done above.
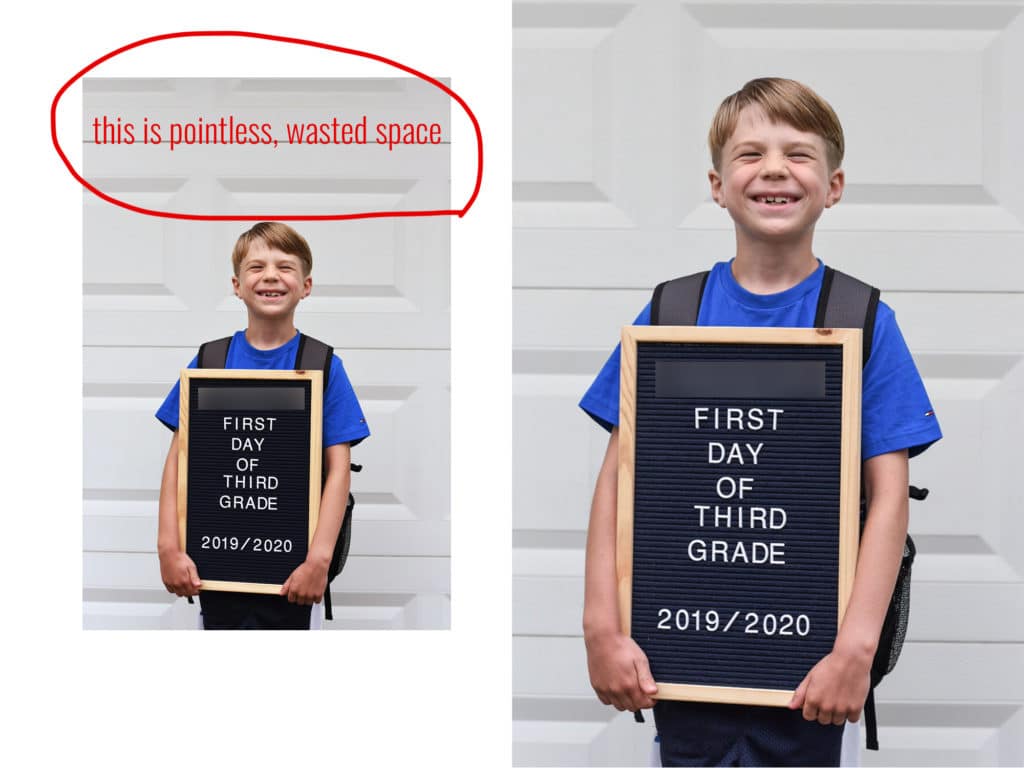
One place you see this alot is with people photos. For some reason, the person’s face is closer to the center of the image, and there is a ton of open/blank space up top.
This space is confusing your eye and making the image boring. Adjust your frame just a bit to bring the face to the top third of the image and remove that blank space for a compelling image.
The only time you’d want to leave that extra space is if you plan on adding text or graphics to the image to use it as an ad or promo. Then space above is perfect for that text.
Join our 5-day photo challenge to learn how to get great photos on social media
2- Clean your lens
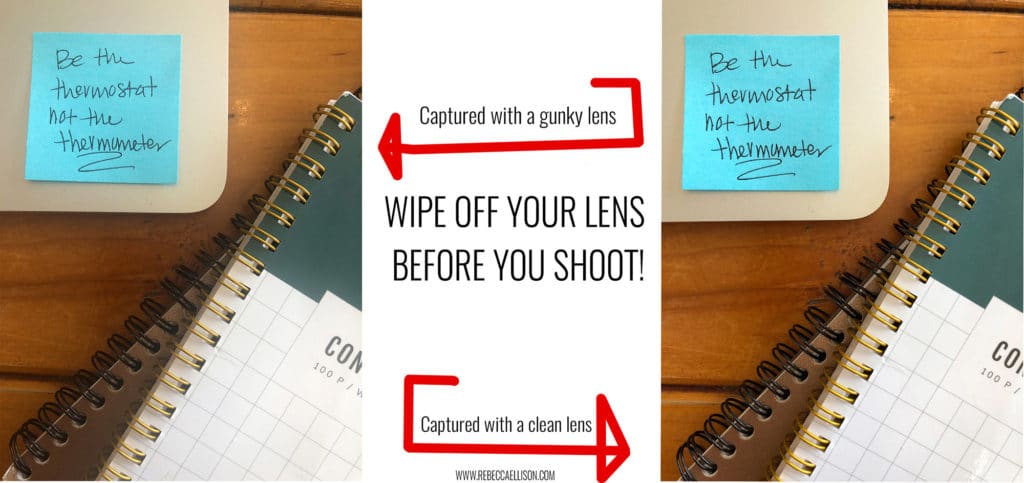
My phone either sits in my back pocket or in my purse. When using the phone, I’m holding it, or it’s in the somewhat grubby hands of my young children.
Needless to say, there is a lot of gunk, grime, fingerprints and straight-up gross that gets on your phone every day.
That gunk gets on the lens, and then you shoot through all the dirt, grime and fingerprints that are on your lens.
When gunk is on your lens, the image looks blurry. Or the lights have those long streaks coming off of them.
Take the moment to use your shirt (or other softer fabric) to wipe off your lens before you take the photo.
You will instantly have images that are crisp and 100x better than the grime filtered ones!
3 – Turn on the grid and use it to create your composition.
You’ve heard the term rule of thirds before but might not have any idea what that means.

In short, the rule of thirds is a way to place the subject of your photo in a spot that is visually compelling.
You can turn on the grid to your smartphone in the settings. (Look in the camera settings for your smartphone to turn on the grid. )
The grid helps you see the area where you should place the subject in your images.
Then, place the subject long the lines of the grid.
Or better yet at the intersection of those lines, and you’ll have a more compelling image.
The rule of thirds is the most popular rule of composition, but there are many more. Check out my composition and styling guide to learn more.
[convertkit form=919804]
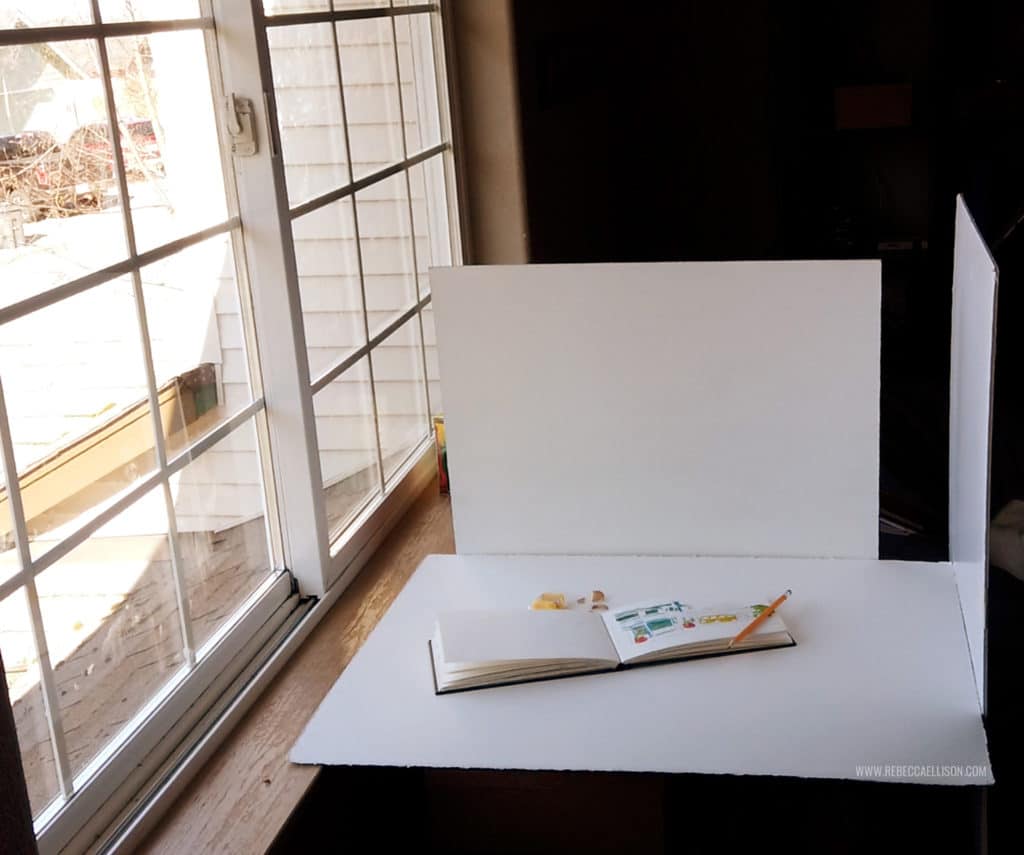
4- Opt for Natural light
If you opt for natural light vs artificial light in your photos, you will create better images.
What do I mean when I say natural light?
Any light that is not created by a light bulb is natural light.
When you are outside, that is natural light.
When you are indoors, opt for using the window light and TURN OFF the indoor lights.
This is important because light has color to it and your camera sees and adjusts to the color.
Our eyes do it too, but the eyes are so good, that we usually don’t notice the color.
Our eye filters it out and shows us what we expect to see, but the camera sees the color of the light available.
A bonus tip is to do your best to shoot in as ample light as possible. As your smartphone starts to lose quality and starts to look grainy when working in dim light.
Join our 5-day photo challenge to learn how to get great photos on social media
5- Avoid direct sunlight, flock to the shade.
Lighting is extremely important in good images.
But it’s also one of the more confusing aspects of creating images.
Your #1 goal is to use natural light.

#2 goal is to use soft light like what comes from a window or shade.
Avoid direct sunlight ESPECIALLY in the middle of the day.
The light is the harshest and at it’s worst angle in the middle of the day.
If you find yourself shooting mid-day, look around for shade. Hang out in that area at the edge of the shade and where the sun hits.
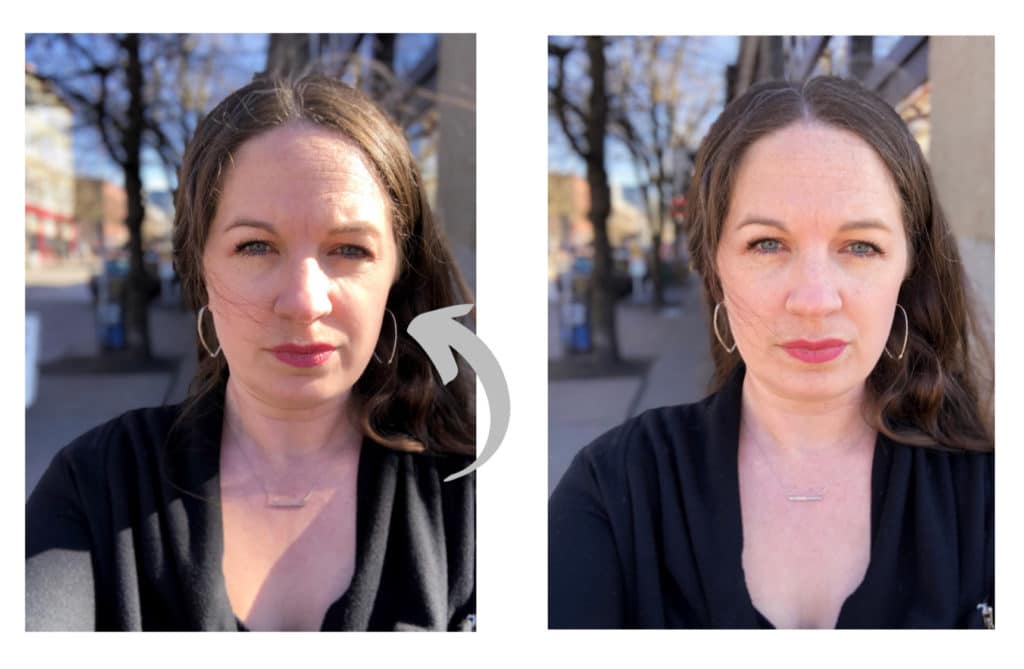
This way you’ll get the brightest light while still being in soft.
The soft, nondirectional light will make your images look beautiful.
[convertkit form=919804]
6- Read the shadows.
The quickest way to start to understand light (when it comes to photography) is to start looking at the shadows.
Your shadows will appear opposite of where the light is coming from and they will tell you a lot.
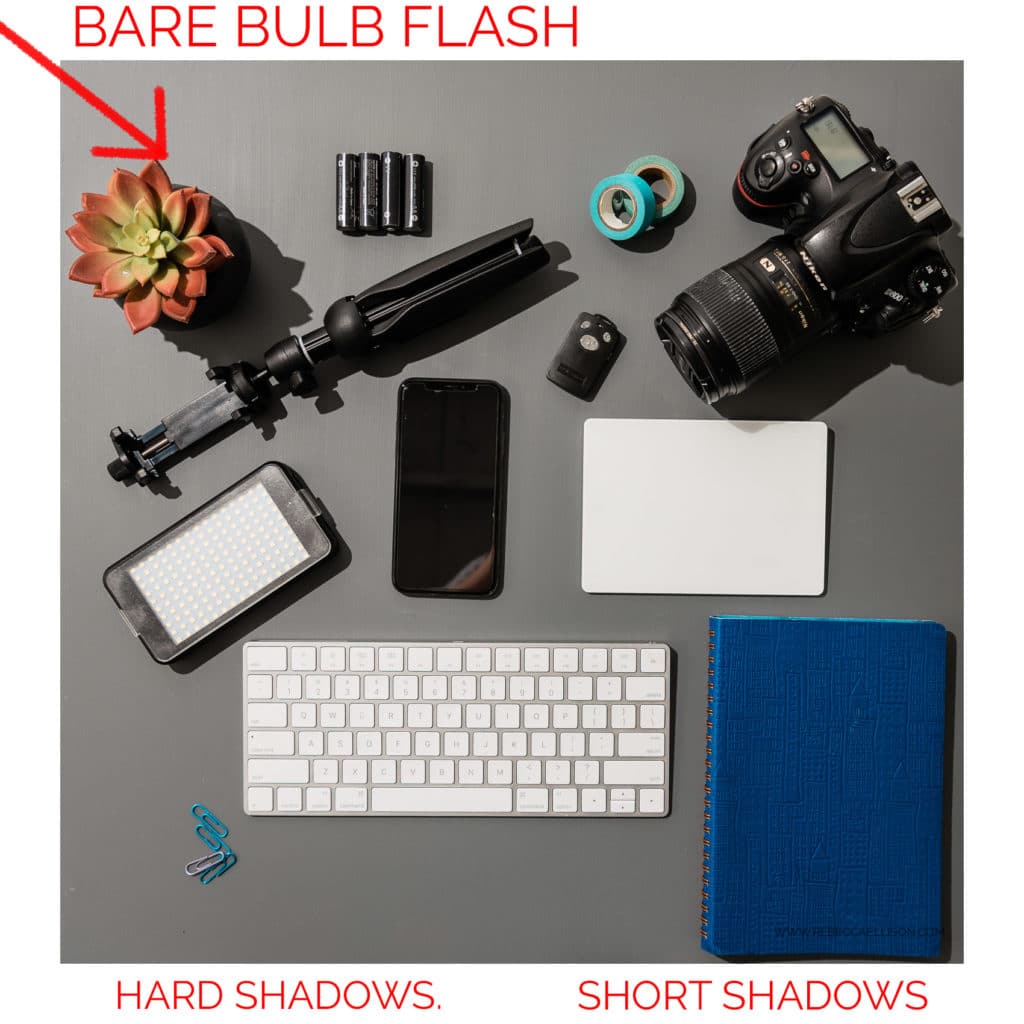
First, look at your subject (human or product) and see what type of shadows is hitting the subject.
Are they distracting?
Are they making it hard to see the thing you want seen the most?
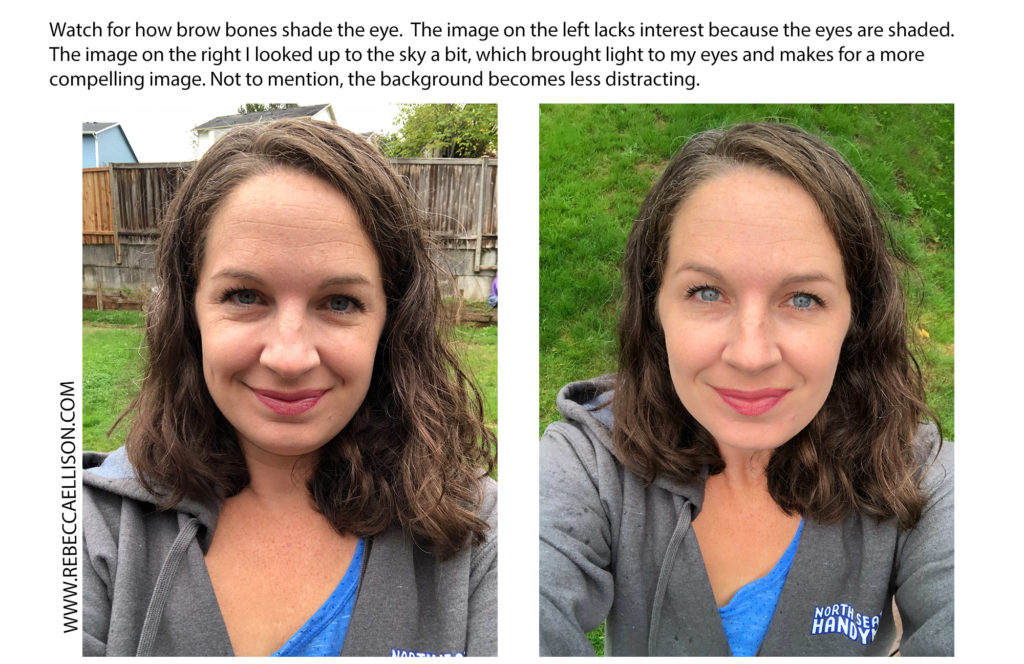
When photographing people, look at their eyes. Does the brow bone shade over the eye? If so, your lighting is working against you.
Turn your subject around in a circle looking specifically at the eyes and if the brow bone is causing a shadow.
Turn them around until the shading disappears and that is the light you want to use.
Join our 5-day photo challenge to learn how to get great photos on social media
7- Use depth to add interest to images
You want your image to capture interest.
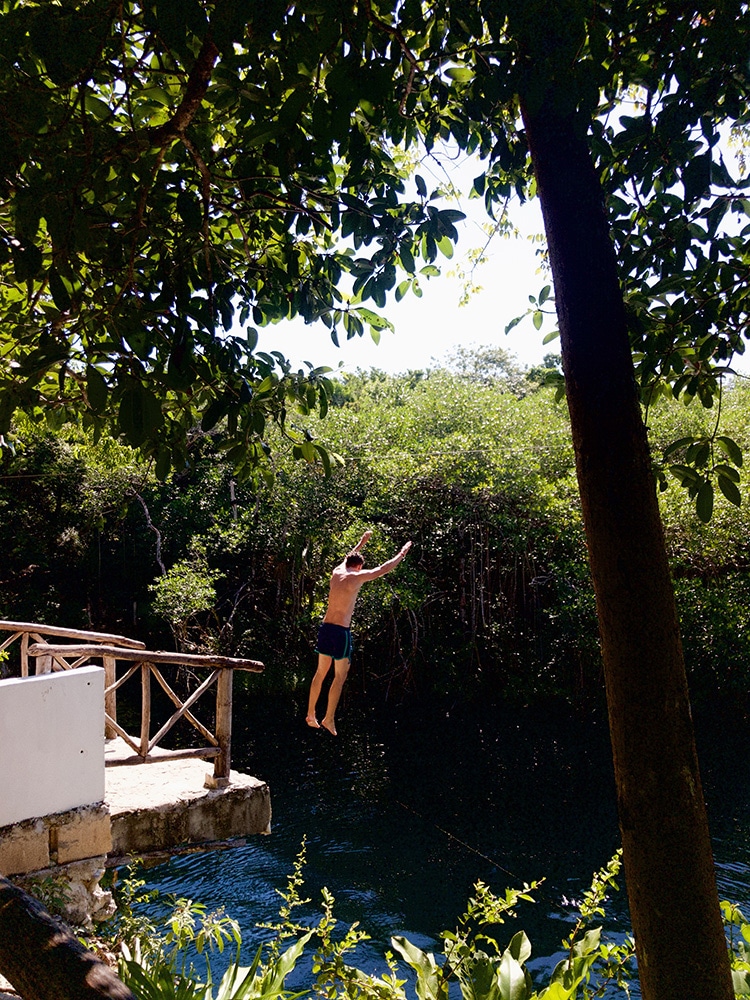
A quick way to do that is to add depth to the image with your framing and composition.
Every image has a foreground (what’s closest to the camera), middle ground (usually where the subject is) and the background (farthest away from the camera).
Use your environment to make sure you have a background. To add more interest, add something closer to the camera for the foreground.
This foreground makes it look like you are looking through to the subject.
Something as simple as holding a leaf close the camera, at the edge of the frame can work to add this depth and interest.
-show image w/ foreground depth
[convertkit form=919804]
8- Grab a tripod and remote trigger.
If you want to create images that don’t look like a selfie, then invest in a tripod and a remote trigger.
This way you can stage the photo in a way that looks as if someone else took it.
Buy a $20 tripod that will extend the full length of your height.This way you can get flattering angles with your photos.
The best angle is having the camera slightly higher than your face . Short tripods won’t be capable of that.
Many selfie-stick and phone tripods are shorter for convenience in traveling. This can be lame because then you can never get a flattering angle while you are shooting.
What’s the point of taking the photo if you aren’t going to like it anyway right?
Many of the small phone tripods also extend via the neck vs extending via the legs.
A caution against this as it makes the camera less stable and more likely to wobble/move during the shoot.
Pick a normal tripod that extends from the legs for the best results.
Using a Bluetooth remote trigger is ideal for taking photos. This way it doesn’t involve running back and pressing the button for the timer.
Another great value of a good tripod is using it when photographing flat lays.
When you are shooting straight down you want it to be parallel to the background of your flat lay.
Even the slightest angle off will change the perspective of the image and make it less impactful.
Use a tripod to ensure the camera is fully to the background so the lines remain square.
[convertkit form=919804]


The comments +