


You see flat lay photographs all the time, but do you know how to create a flat lay for Instagram?
A beautiful product shot is extremely important in the 2025 digital purchasing market. Flatlay photos do a great job of creating those beautiful product shots.

I fell in love with product photography back in photo school and a great product shot still intrigues me, even 15 years later.
Product photography done well brings that item to life. It creates a desire in the viewer to have the item.
When I left photo school back in 2005, I wanted to be a product photographer, I loved it so much.
Then I got to experience a wedding, and my desires shifted for a time.
Now I’m excited to be circling back to helping others see the beauty of great product imagery.
A lot has changed in the past 15 years, to where it’s now accessible for anyone to create a beautiful and compelling flat lay.
Creating these flat lays have become even more popular thanks to Instagram

Being able to create a feeling of desire from a simple photo is a powerful way to connect with your customers.
In this increasingly digital world, the quality of the images you create is critical to how people perceive your brand and your products.
For example, it doesn’t matter how special and amazing the skin cream you created is if the first impression people see of it is via photo that looks like a snapshot.
No one will pull out their credit card to spend $25 on that skin cream unless the packaging and image creates a desire to have the cream.
There is a reason the advertising world is a multi billion dollar industry. It’s because imagery is a strong motivator to purchasing.
This is why I love flat lay images. You can convey so much in the image, telling a story with the props you use.
6 Key Aspects for How to Create a Flat Lay for Instagram :

1 -Shoot from a birds eye view
Flat lay images are from birds eye view. This is why they are a flat lay, you are looking down into the image.
This by nature removes some of the depth in the image.
By looking down on the items instead of into them, they are all the same plane of focus. Which forces you to tell a story with the props and styling of the image.
If you are creating a lot of flat lays, it’s best to use a tripod to ensure you are coming from directly overhead.
If you use a tripod, choose one that has an extendable arm so that you don’t see the leg of the tripod in the image.
Expect to invest $100-$150 for a tripod with this capabilities.
If you are not shooting a ton of flat lays, then you can hand hold the camera, just stay very aware of the angle of the camera and the angle of the flat lay.
You want the camera parallel to the the image for best results.
2- Lighting your flat lay
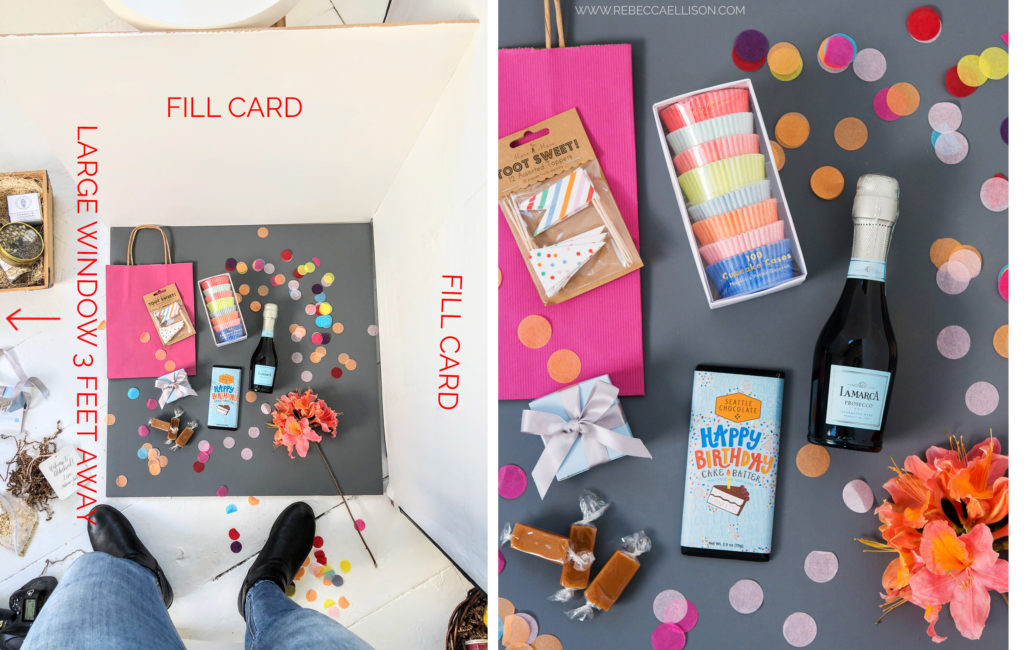
The setup to create a flat lay for Instagram using window light is to start with your background on the floor, or table next to a window.
The floor makes it easier to get the birds eye view.
The image above, my background is a 2’x2′ plywood board I picked up at Home Depot for $4 and painted grey.
The two white fill cards to the top and right of the image are also 2’x2′ plywood painted white.
I use those for backgrounds as well, so they easily work as both background and fill card.
For quick and easy fill cards, hop over to the local drug store or craft store and pick up 2 or 3 16×20(ish) size white foam core boards.
You’ll find them in the school supply section.
You want foam core vs white paper because it stands up on its own and it will keep you from pulling your hair out in frustration 😉
For the image above, I was about 3 feet away from the window.
This was the area in the room that had the most light that was even from corner to corner of my image.
It was a bright white room, so I had ample light.
If you are working in a house with less than ample light, you’ll want to have your scene closer to the window.
Make sure there are not any added shadows in the scene (like from you leaning over top of the scene to take the photo).
Use the fill cards so that they are barely out of frame to get as much light as possible added to the image.
Add a white fill card to the side of the image that has the shadows so that the white card bounces light back in and brightens up the shadows.
For example, if you have a window camera left, you’d place your fill card at camera right to bounce the light from the window back into the image.
This bounced light then lightens up the shadows.
Add more fill cards to the other sides of the image to create an even more evenly lit and shadowless image.
If your goal is a flat lay image without shadows, ample light and lots of fill cards are your key to getting this look.

If you don’t have enough light indoors, go outside. Open shade is great for shooting flat lay photos.
Open shade is an area that is in shade but does not have anything directly over you.
The side of a building where you are in shade and you see open sky when you look up is great.
Use the same fill cards to fill in any shadows and brighten your scene.
Overcast days outside also work really well.
Watch for your own shadow being cast, even if it seems like a subtle shadow to you.
Any shadow will affect the image poorly.
Move around until you are not casting a shadow and create your flat lay.

For this invite suite I was photographing for Chalk.Ink.Style we wanted consistency and as much detail as possible.
I brought out my 24″ softbox and lit the scene from the top of the image, and used a white fill card at the bottom of the image.
This image was created with a softbox and a strobe which is a larger investment ($500+).
There are options available these days with softboxes using a constant light output which are easier to see how the light will interact in the image vs with a strobe ( which is a powerful flash) like this Amazon link (affiliate) below.
Having a softbox setup takes up more room, but will give you consistent results every single time.
If you plan on growing your Instagram following, having consistent imagery makes a huge difference, and so a softbox setup would be the way to go.
You can invest anywhere from around $200-$2000 on this lighting setup, and this Fovitec 3 light setup with continuous lights looks to be a great quality for the price.
3- Choose your background carefully.
The brightly lit on a white background flat lay images are very popular, where the shadows are non existent or barely there.
You get this affect when you use window light or shoot outside in open shade.
More often than not, your white background will look like a muddy white background once posted to Instagram.
This happens because the white boarder of Instagram is 100% white. In turn your image background which isn’t 100% white will look muddy.
When you see posts that have fully white backgrounds, there is a lot of work done in Photoshop to remove the color of the white while not sacrificing the look of the products.
To start choose a background that is not white.
Do to the complexity of getting the background while not losing any product detail.
Choose a background that has a little bit of color or texture to it like the grey or blue backgrounds above.
This way you don’t have to struggle with the whites looking off.
Save the white background flat lays to when you have more experience and want to jump into Photoshop and retouching.
You can use a background in your home.
A nice blanket or throw, your countertop or slats of wood.
It depends on your brand and your aesthetic on what background you choose.
The best thing is that you can create style boards for your backgrounds that make it easy to use again and again.
I did a post on how to DIY your flat lay style boards you can reference.
I’ve created fabric style boards.
I’ve also created style boards of contact paper to create a look like marble when I don’t a have a lick of actual marble in my home.
The style board below is contact paper on a book board.

4- Props props and more props.
Using props that help tell the story of your product is important.
If you are photographing skin care, you can have props like face scrubbers and different plants.
Think about materials that are in the product in your image.
Get ideas off of Instagram or Pinterest of how you can prop to tell the story of the product.
5- Theme with color
The more items that fit within the color scheme will make the photo work better together.
Like the birthday flat lay above, there are a lot of blue pinks and oranges in the image.
The colors repeat themselves and visually tell the story that they are together.
6- Editing Consistency
For most any photography, what matters the most is good lighting and consistent editing.
Many choose to gloss over the editing portion picking whatever they think works for the moment.
I urge you to create or purchase presets. Find one that works with your branding and use ONLY that preset.
The most engaged brands on social have images that are similar in tone, style and coloring.
When people see the image their brain recognizes it as that brand instantly. Spend time finding the preset/look you like.
Then use it every single time and that will go a long way to creating a consistent brand.
Get Ideas on How to Create Flat Lays for Instagram Below
To recap how to create flat lays for Instagram
- Shoot from a birds eye view
- Light your flat lay
- Choose different backgrounds
- Add props
- Theme with color
- Edit consistently
Keep Reading : 5 Lighting Tips that Will Transform Your Photos


The comments +