


Do you get frustrated because your iPhone camera makes you look orange?
It happens like this: Your iPhone is out and ready and you are about to take a photo to post on Instagram for your biz, but every photo from your iPhone camera makes you look orange,
What is going on?

Why are skin tones looking like an Oompa Loompa?
You know you do not want your iphone camera making your skin look orange but don’t really know what is going on in the first place. Let alone how to fix it. So you snap the photo.
You pop into your fave editing app and try and “fix” the photo. You tweak the color but nothing quite makes it look right. The more you edit, the more “edited” the photo looks but you don’t know what to do.
Then you hop onto Instagram, upload the photo, attempt one of those crazy Instagram filters just to mask the color more and hope no one else will notice. Hit publish and call it good.
But then you have crickets on your post. No engagement means no comments. Apparently, orange photos are not appealing to others either. But how do you avoid orange photos in the first place?
Unattractive orange color in your photos makes for mediocre images. To top it off, that orange color can’t really “fixed” in editing.

No one likes looking like an oompa-loompa so let’s avoid it altogether!

If you want an in depth guide on how to pose for your body – check out my good friend’s Posing Bible. It’s a great guide to posing no matter how uncomfortable you feel in front of the camera! (affiliate link)
When your iPhone camera makes you look orange, it isn’t a problem with your iPhone, it’s a problem with your lighting.
Simple answer: your camera is confused by multiple light sources in the photo. The camera is giving a wonky white balance because it’s confusing.
Remove one of the light sources from the photo, and your camera will automatically fix your white balance (otherwise knowns as color temperature)
Your iPhone (and any camera) adjusts to color temperature. Its literally sees different types of light as different colors. If you use two different types of light in a scene, the camera can’t adjust because there are too many options.
Daylight color is blue
Indoor lights color is orange
When you have indoor lights on, and a window lighting the scene, you are showing a blue and an orange light to your camera and expecting it to look good.
Your camera doesn’t know which to adjust to so it either picks one and the other light source shows up a weird color, or it picks something in the middle, which always looks bad.
How does white balance affect your photo?
What your camera is looking for is called white balance. You’ve probably seen WB or AWB on your camera in the past. This is White Balance (WB) or Auto White Balance (AWB).
The camera is set to see the color, adjust to make skin tones look pretty and neutral and call it good. The camera is looking for 18% grey and it uses white, grey and black areas in the photo to automatically adjust.
When you are trying to take a photo indoors with the indoor lights on, and you are by a window, you are asking your camera to guess as to what you want.
Since there is both daylight (blue) and indoor (orange) light in the image and the combo of the light temperatures makes that 18% grey that the camera looking for make skin tones either orange or blue.
The combination of those two light sources (and their different color temperatures) tell the camera to adjust in a way that makes your image color look less than appealing.
Look at the photos to the right. The bottom right image has skin tones that are most accurate and the other three images are where the camera is trying to pick between daylight (blue) or indoor light (orange) color temperature. And doing a poor job of it.
If the iPhone chooses to adjust for the warm tones of the indoor light, then you’ll see blue areas in the photo where ever that daylight is brighter in than the indoor lights, or it will pick something in the middle.
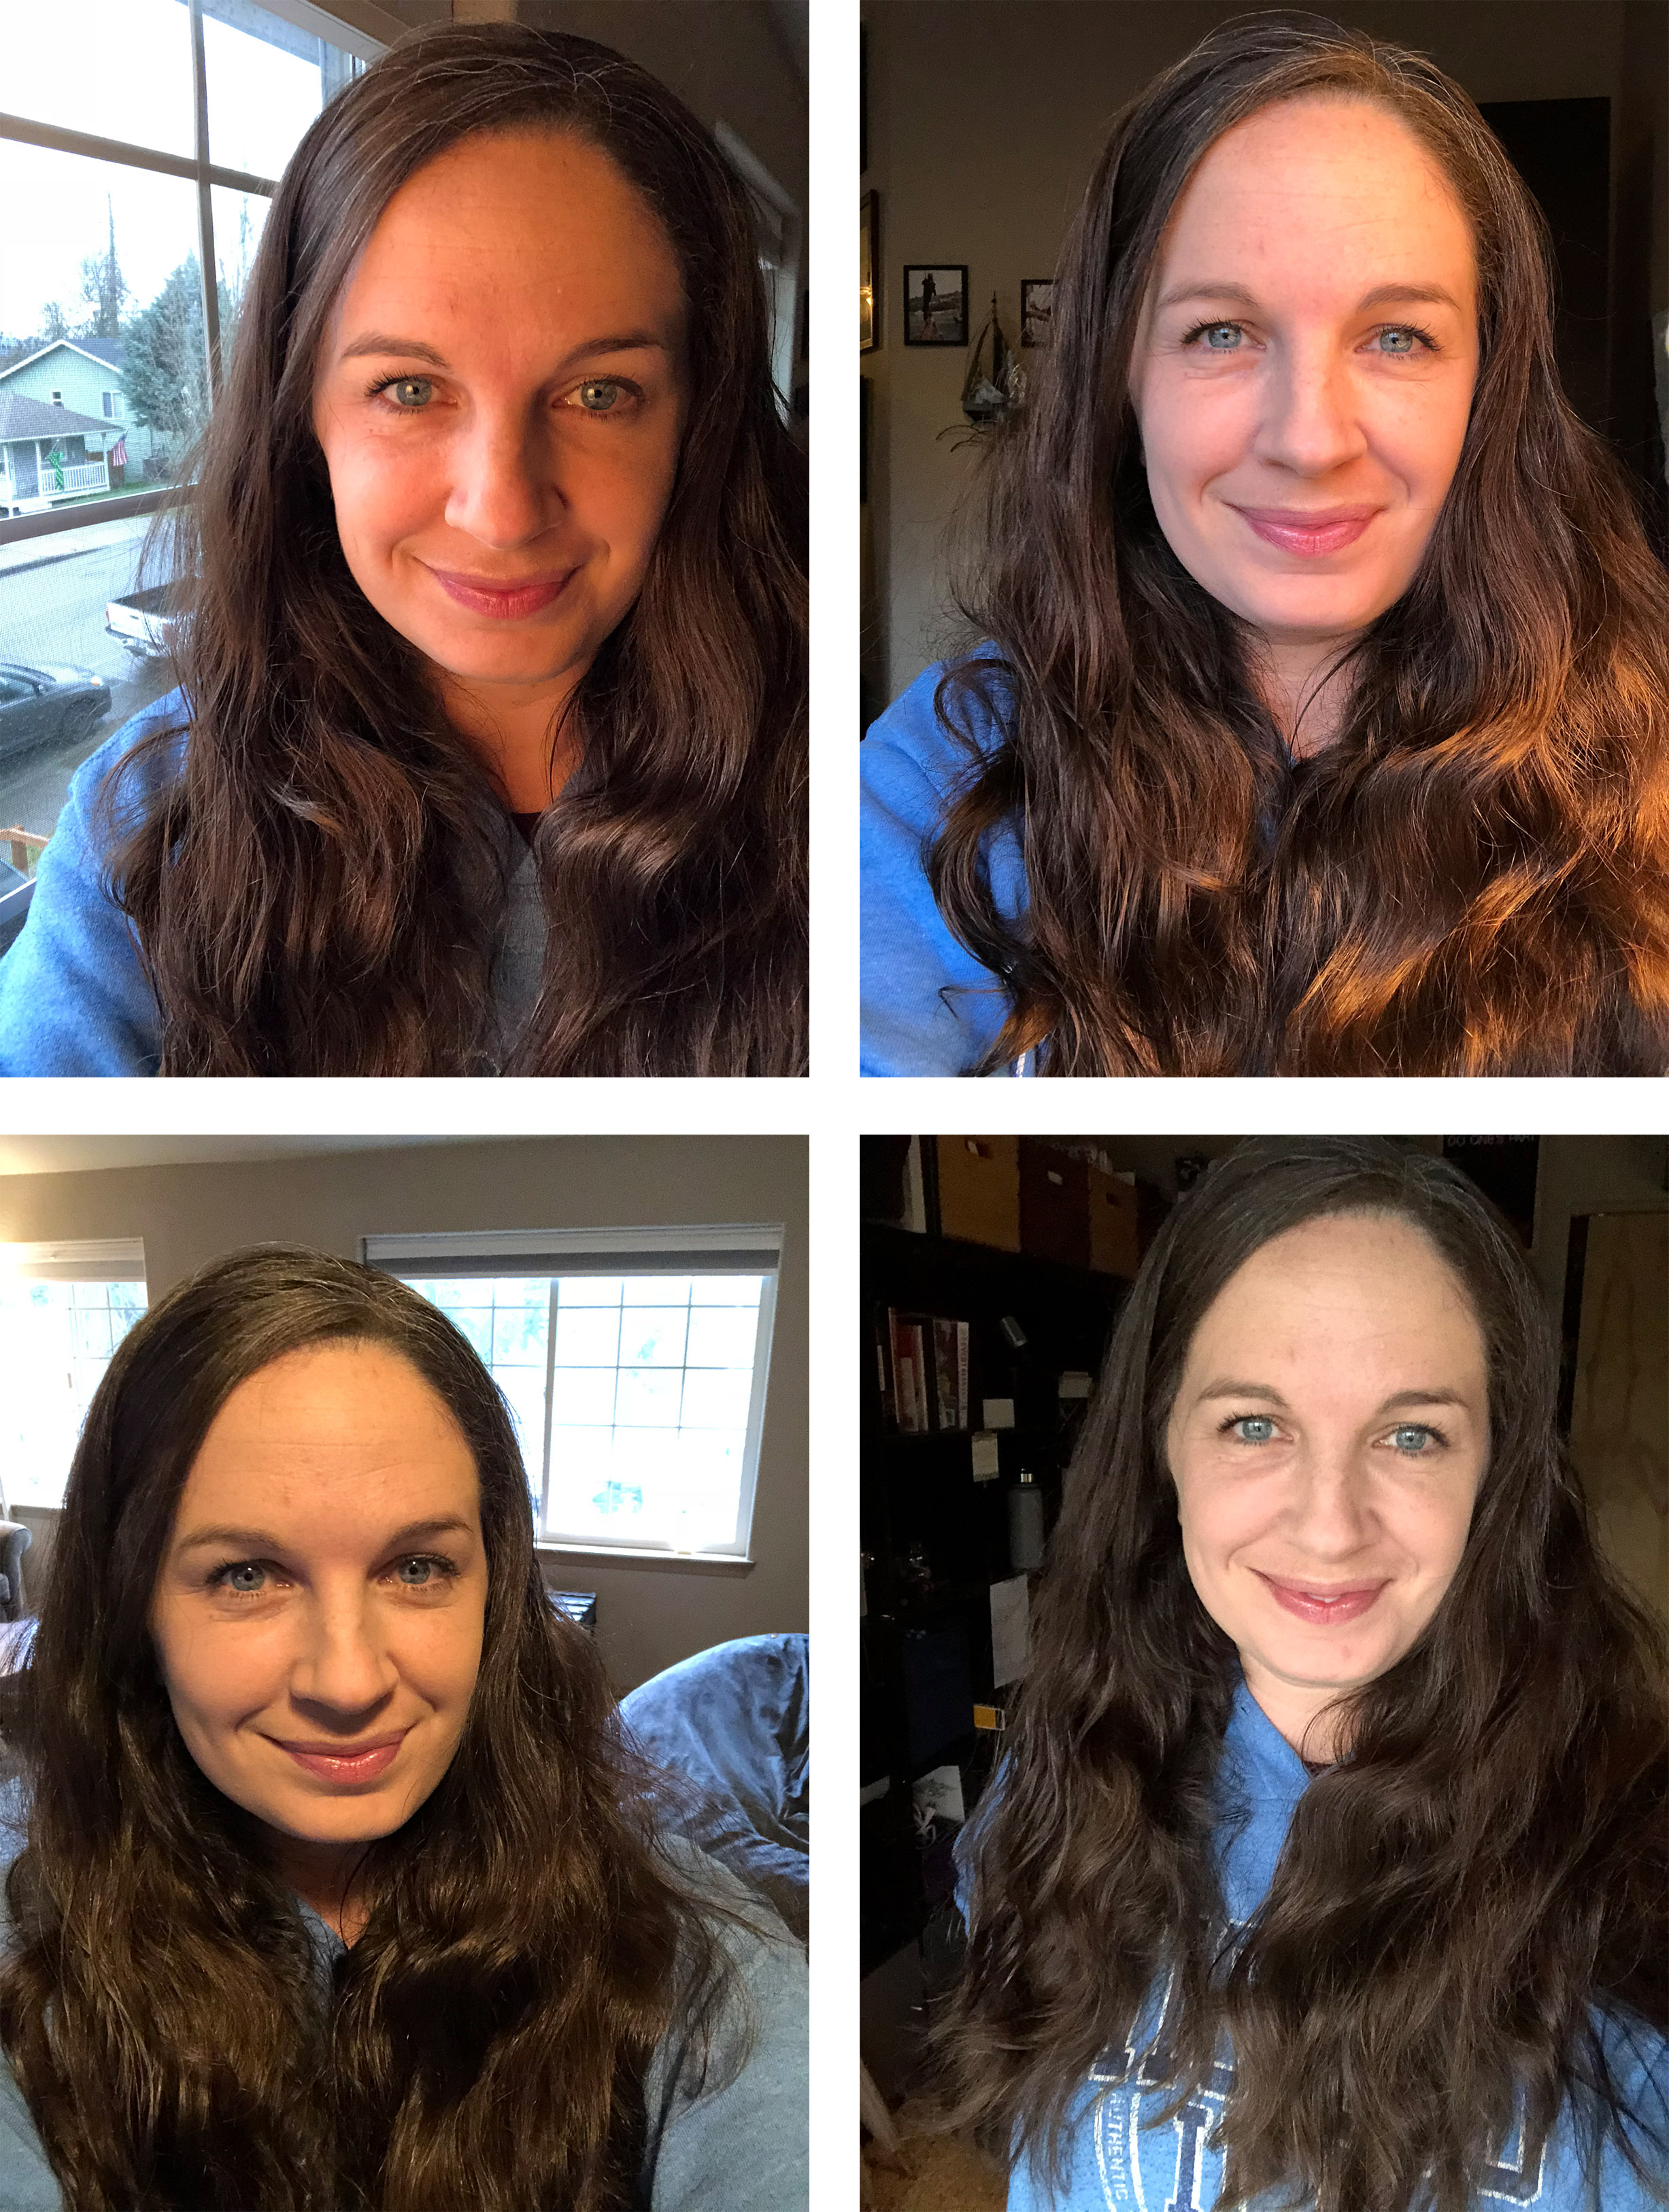
Let’s look at these photos and explain the light in them and how it’s affecting the picture.
Top Left Photo:
You can see the window behind me, there is an indoor lamp directly next to the window which is lighting me. The camera sees the blue daylight and the orange indoor light as well and picks in between, but closer to the indoor light. Hello oompa loompa.
Top Right Photo:
is where I am standing in front of the window and the lamp is the right side of the photo. The camera has auto changed to more of a daylight balance which is making the left side of my face look decent, then the right side of the photo turns super orange in color.
Bottom Left Photo:
This image has those windows in the background again. I’m further into the room and directly under a ceiling light. Since that window is taking up about 1/4 of the image, it is making the camera confused and it’s picking a color in the in-between which gives me that splendid yellow tone. 🤢
Bottom Right Photo:
This image, I turned off all the indoor lights, stood by the window and took the photo. This took away all the confusion for the camera because now there is one light source to balance to : daylight. And this is the best image of the pack.
To get rid of the orange color in your photos use only 1 light source in your scene.
You can choose between using indoor light or daylight.

If you are shooting indoors during the day, it can be pretty hard to remove all the daylight from the scene unless you have blackout curtains.
Daylight coming in your window is also a much more flattering light than 90% of indoor ceiling type lights.
So my suggestion is to default to turn off the lights in the room and use the daylight 9 out of 10 times.

As you can see from the photos above.
The left image is window light only.
The middle image is indoor light only (with use of a blackout curtain ).
The last photo is where the window has window light my face, and indoor light in the background.
The image that looks best in the quality of light and color of light is the window lit photo on the left.
The indoor light photo in the middle is a decent color because the window light was removed.
The location of the light (mounted to the ceiling) though, I had to lift my head up a lot w/ the camera to get light in my eyes, and the shadow under my eyebrows make this lightless appealing than that of the window light which is evener.
Then the right side photo, you can see how the color becomes more slightly redder/orange just by turning that light behind me on. And now you can see the distracting elements of my office as well which is less than ideal.
If you don’t want your iPhone camera to make you orange, you need to fix the lighting BEFORE you take the photo.
Which can easily be done by turning off the indoor lights and move towards the window.
Next, check out past articles of my top 5 fave editing apps for the iPhone
To recap:
- Before you take your photo, look around at the light you are in. How many light sources do you see? If there is more than 1 type of light, then remove (turn off, or use blackout blinds) the light you don’t need.
- Blue tones, happen when the camera adjusts for the indoor light and daylight in the image is bright.
- Orange images happen because the iPhone adjusts to the window light white balance (daylight) and the orange is caused by the indoor lights which also light the scene.
- Fix the orange or blue color by removing one of the light sources.
- My suggestion is to turn off the indoor lights and use the window light to light your scene. The quality of light appeals more than that of the indoor can light from above.
If you are a visual person, take a look at the video below.
I show you how the iPhone automatically adjusts for the white balance as I change between window light and indoor lights below!
You’ll be able to see the color shift as I move around the house and how the image changes.
Let me know what you think!
Next, check out past articles of my top 5 fave editing apps for the iPhone


This is great! I struggle because often times I need to take blog pics at night when my kids are sleeping and there is no natural light to be found.
I’ve been trying to do stop motion with colorful LEGO action figures. My problem was that it kept turning the green screen into a turquoise screen and back! I tried this trick and it helped me a little, because the screen stayed green when I put a blue character on the screen and took it away. However, when I introduced a lime character it completely freaked out it turned it super tuqrquoise even though it was only inside light! I’m so confused! Can you please help me put all the different colors on screen without it changing the color of the background?
Hello Tyler!
You may find more success if you use a third-party app that allows you to control the white balance. The default camera app on the iPhone does not give you the ability to control your white balance, and that is why the color keeps shifting for you.
Try Camera+2 app. When you download, you’ll see a WB (white balance) mode option. If you are using daylight, then put it on the sun. If you are using indoor lights, then put it on the lightbulb. And then your white balance will stop shifting on you!
Thanks for the tip, I’ll try downloading it soon!
This is not helpful for outside photos. Sunsets in particular always turn orange and I can’t remove the light source then.
Hello Sarah!
Yes, you are right, you can not adjust the light source when shooting during sunset. The light during sunset is a very warm, and so naturally orange/yellow light. This is just the nature of sunset time and there really are not many tricks to changing this light. The best option would be to move out of the direct light of the sunset if you don’t like the color. Or you can download a third-party photo app like Camera +2 that lets you manually control the white balance. When controlling the white balance, you can remove the orange color from the skin. Just understand it will also remove the color in the sunset itself as well! Hope this was helpful 🙂
Great article. Could not find this info anywhere else. Thanks.
This was extremely helpful for me. I couldn’t understand why my video/pics were coming out so orange. I thought it might a camera s we setting but it makes sense after reading your article. Can’t thank you enough!
Very helpful – just changed the entire look of my videos. Thank you.