As small business owners, we have a lot on our plate. There are a lot of hats to be worn, and being the main marketer is one of them.

Especially with the popularity of Instagram, marketing can take front and center in our business as we try to stay in front of the algorithm and keep Instagram useful to us.
But how do you keep the photos that you use in your business so that they are organized and ready to be used?
Here is how I suggest you organize your photos. In this example, I’m going to say you are a wedding cake baker so that I can get specific on how the folders can get organized.

1) Open a Dropbox account to store your images in the cloud in an easy to access location.
I love Dropbox for many reasons, but mostly because it’s easily usable from my iPhone, my laptop and desktop and also accessible via a web browser, and it’s free for up to 2gb which is a lot of jpgs if you are only using it for your photo storage.
Once you’ve downloaded Dropbox onto your computer, you can access it as if it is just a folder on your computer and move files around like normal instead of constantly having to wait for uploads and downloads. Dropbox does all that in the background, so there isn’t a lot of time wasted in waiting for uploads or downloads.
Then download the Dropbox app for your phone, so that your images are updated and available to you on your phone and computer. Organize from the computer, then save onto your phone from the app and upload to Instagram!
2) Separate out your high resolution images from your web resolution images
What’s the difference?
- High (print) resolution images, like ones from your phone and your camera are print quality images, but you don’t want to load those on the web because it will slow everything down (and google will penalize you for it,)
- Web resolution images are made smaller so that you can put on the web and Google likes it. But if you try and print from those, the quality will suffer. Usually if you are in the wedding industry and you get an image from the photographer, you will be getting a web resolution image.

It’s important to make sure you have the high resolution images separated from the web resolution images so they are used in the right places.
You will even have duplicate images that are web quality and print quality in different folders so you know whats what.

3) Create a file structure to your folders to find types of images fast
In your dropbox, I suggest making a folder with your business name first. Then inside that folder, add [biz name] photos, then inside add folders that categorize your images into if they are high resolution or web resolution and then by smaller sections that describe the type of image.
This way
As you can see below is an example of a folder structure that will work great for you.

If you take the time to organize your photos at the beginning, it will pay off in spades when you go to post something on your website, your blog, your social media or any of those needs.
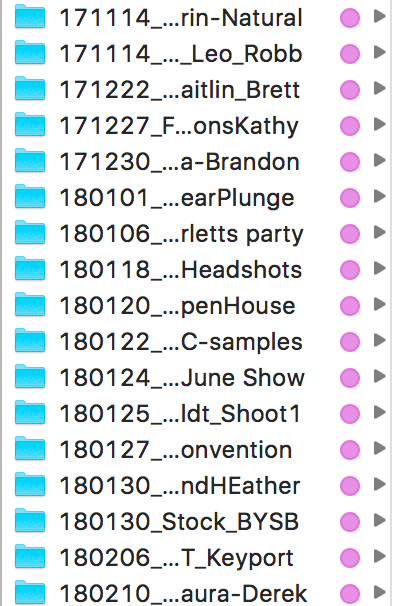
4 ) Bonus for event specific images :: Add the date to the folder

This step is great for event and wedding professionals. You’ll likely have images that relate to a certain event date so when you create your folder names, you should use a format like
YYMMDD_client-name
on your folders so that you can always find your images related to that specific event.
This is how I organize my event folders like what you see below. So it’s always in date order and easily finable.
Like this? Learn more with this article : Repurposing:: the Secret to Mating Social Media Easier

The comments +